Lately, I’m quite often in the workshop and I’m really happy about that. The more time I spend there the more fulfilled I feel and the more I can do. The workshop is basically my sanctuary and the beginning of every project in and around the house.
On several occasions, I made projects by using either melamine or simply particleboard where I made a wardrobe, I built my lovely workbench, a permanent place for my miter saw, and heck I even built a Moxon style vise with particleboard that still works.
This is all great and I’m happy about the projects but the moment that I take out my circular saw or my jigsaw, the mayhem begins. Cutting anything with them creates a lot of dust that immediately gets airborne and that is a hazard to my health. Besides that, my kids are often there with me and I want to make the shop as safe as possible environment for them as well.
Airborne dust in my workshop from cutting particleboard
To mitigate this issue, I have several ideas for dust collection projects but for start, I wanted to tackle the very fine dust that tends to stay in the air for a long time. The larger pieces fall to the ground relatively quickly and they are not that big of a threat.
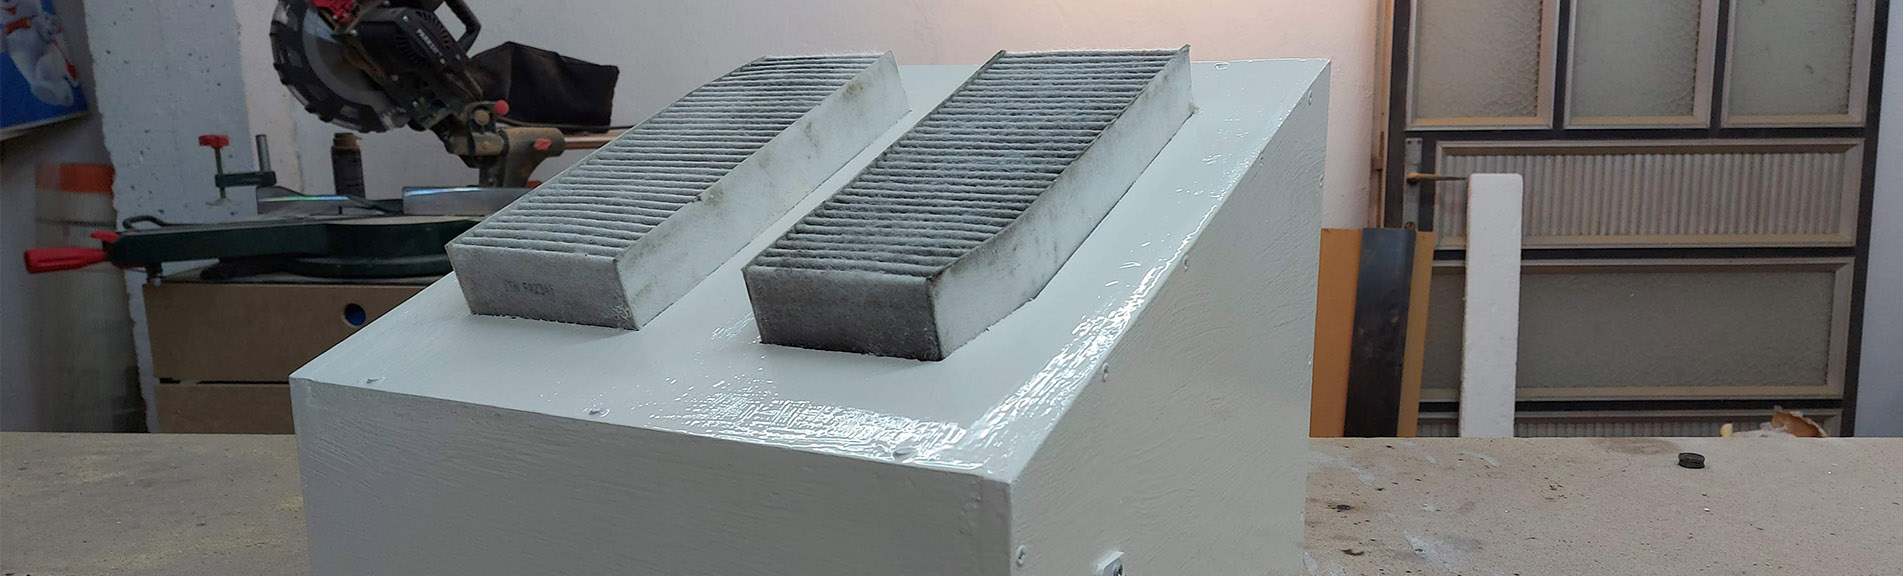
In an effort to utilize what I have on hand, I made this air filter by using the blower from a clothes dryer machine that I’ve dismantled, and since I also kept all of the wirings from it I also used the external AC plug.
The actual filtering on the filter is done with two, car engine filters that a friend gave me. They are used, but that should not make any difference for the purposes of what I need. The idea is that the blower will be enclosed inside a box and the exhaust of it will be outside of the box.
Once the blower is turned on, there will be a negative pressure inside the box and the only way that air can get inside the box to fill in this negative pressure will be through the filters that are mounted on the top.
The filters have a rubber seal on their end and that will help a lot to seal up the top, even if the cutouts in the particleboard are not that perfect.
With usage, I expect that the filters will get dusty, but since they protrude to the outside of the box I can very easily clean them with a vacuum cleaner without opening the filter box. If they get damaged for some reason, I already have a few more and it will be very easy to find more.
If you want to replicate this project or build something similar you can stop by any car repair shop and ask them to save a few of the filters that they replace and they will be more than happy to do so for you. They end up in the trash anyway so you can get a lot of them for free.
Check out the video below of me building this workshop air filter and if you like what you see then be sure to subscribe to my YouTube channel. It means a lot!
For more detailed written instructions, check out the build article over at Instructables.
Tools and materials used in the video:
- Circular saw - https://s.click.aliexpress.com/e/_985NSZ
- Jigsaw - https://s.click.aliexpress.com/e/_A1I0wz
- Battery drill - https://s.click.aliexpress.com/e/_AYKiVb
- Metal ruler - https://s.click.aliexpress.com/e/_ACFoKH
- Combination square - https://s.click.aliexpress.com/e/_9IvM9T
- Digital angle finder - https://s.click.aliexpress.com/e/_AMPn3j
- F Clamps - https://s.click.aliexpress.com/e/_AB0mkv
- Assorted drill bit set - https://s.click.aliexpress.com/e/_A18pvR
- Blower fan - https://s.click.aliexpress.com/e/_AB6l5R
- Car air filter - https://s.click.aliexpress.com/e/_9fNu7R


